Creating Bitmap Fonts for HiPi Graphics Modules
The bitmap fonts included with HiPi have a limited set of characters. If you would like to create your own bitmap fonts with an extended character set for use with HiPi::Interface::MonoOLED or HiPi::Interface::EPaper, you can do so by following these instructions.
Building FontBuilder
I used FontBuilder to create the bitmap descriptions. The JSON exporter required a minor fix so I forked the project here: FontBuilder fork
First we need to install the prerequisites for building FontBuilder on the Pi.
sudo apt-get update
sudo apt-get install qtbase5-dev \
                     libfreetype6-dev \
                     gcc \
                     g++ \
                     make
Download the source from the FontBuilder fork: https://github.com/markdootson/fontbuilder
Extract it and in the top level directory do:
qmake
make
move to that subdirectory and run FontBuilder
cd bin
./FontBuilder
You nust have a graphical environment available. If your Pi is headless, use VNC.
Choosing Font Parameters

You need to choose a font that contains the characters you are interested in. Google Fonts has an extensive collection of fonts provided under various Open Source licenses.
The settings I used for the builtin fonts were:
- Smoothing : No smoothing
- DPI : 72 for Standard and Extended fonts, 96 for the EPD fonts.
- Hinting : ForceFreetypeAutohinting
Choosing Characters

Select the characters you want to include. You should always include the space character ( U+0020 ) so that rendering has a fallback 'space between characters' setting.
View the Font Image Preview to check that the characters you have selected are present in and being extracted from the font.
Choosing Layout

To create the builtin fonts I used the settings shown above.
Output Font

For output, you must choose:
- Image Format : PNG
- Description Format : JSON
Creating Bitmap Perl Fonts
Now you have 1 or more sets of JSON and PNG file pairs in your output directory.
Assuming you want to call your font modules something like 'MyFont::TheFontName15' and you want the font modules placing in the directory '/home/pi/myproject/lib/MyFont', create a script containing the following code.
#!/usr/bin/perl
use strict;
use warnings;
use HiPi::Utils::OLEDFont;

my $srcfolder = q(/thepath/whereyou/created/png_json_files);
my $tgtfolder = q(/home/pi/myproject/lib/MyFont);

opendir( my $dir, $srcfolder) or die $!;
my @jsonfiles = grep { /\.json$/ && -f qq($srcfolder/$_) } readdir( $dir );
closedir( $dir );

for my $jsonfile ( @jsonfiles ) {

    my $util = HiPi::Utils::OLEDFont->new(
        output_folder => $tgtfolder,
        input_folder  => $srcfolder,
        json_file     => $jsonfile,
        module_base   => 'MyFont',
    );

    $util->write_font;
}

1;

__END__
You should now have 1 or more font modules in your chosen target folder.
Using the Custom Fonts in Code
You use the fonts in code by passing a reference to an instance of the font rather than the font name to the text methods.
#!/usr/bin/perl
use utf8;   # so we can have literals in code
use strict;
use warnings;
use HiPi qw( :oled );
use HiPi::Interface::MonoOLED;
use lib '/home/pi/myproject/lib';
use MyFont::TheFontName15;

my $oled = HiPi::Interface::MonoOLED->new(
    type => SSD1306_128_X_64_I2C
);

my $font = MyFont::TheFontName15->new;

$oled->draw_text(0,0, 'Привет мир', $font );
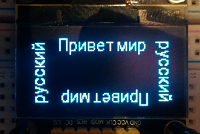
Rotated text using a custom font containing Cyrillic characters
